
This assessment is by Homebrew Finds Contributor Brad Probert. Brad is an engineer, professional homebrewer and skilled reviewer. Seize a hyperlink to Brad’s web site on the finish of this assessment.
Tapcooler Bottle Filler
Typically it’s doable to go in a circle, however nonetheless be shifting ahead. For me, that’s occurred with bottling. Like most, I began homebrewing by bottling the whole lot. However I bought bored with peeling labels, washing bottles, and the general chore of bottling 5 gallons of beer from a bucket with a gravity fed bottle filler. So I switched, and have been kegging ever since. The one disadvantage is it’s not as simply shared with others. I’ve bought a number of nice pressurized growlers that clear up my downside for bringing some alongside to a celebration, however I didn’t have a superb resolution for passing on a pair pints to buddies or neighbors.
Examine Present Pricing and View Out there Equipment, Overview Continues Beneath
Nice Fermentations has put collectively a setup for homebrew-canners…
A small firm in Norway (simply 2 individuals), known as Tapcooler, has created a product that’s particularly designed for homebrewers that keg their beer, however need to have the ability to share it in bottles. They improved upon the same design available on the market by including the performance of CO2 purging to a counterpressure bottle filler. Their product was met with nice suggestions from homebrewers in Norway, and now they export it globally. You should utilize it to avoid wasting the previous few pints when a keg is getting low and also you want house, wish to share beer with a good friend, or wish to ship in beer to a homebrew competitors. Their bottle filler is completely different than your typical beer gun, in that it’s particularly designed to hook up with your faucet, and it’s additionally designed to fill with again stress within the bottle so that you don’t lose most of your CO2 when filling.
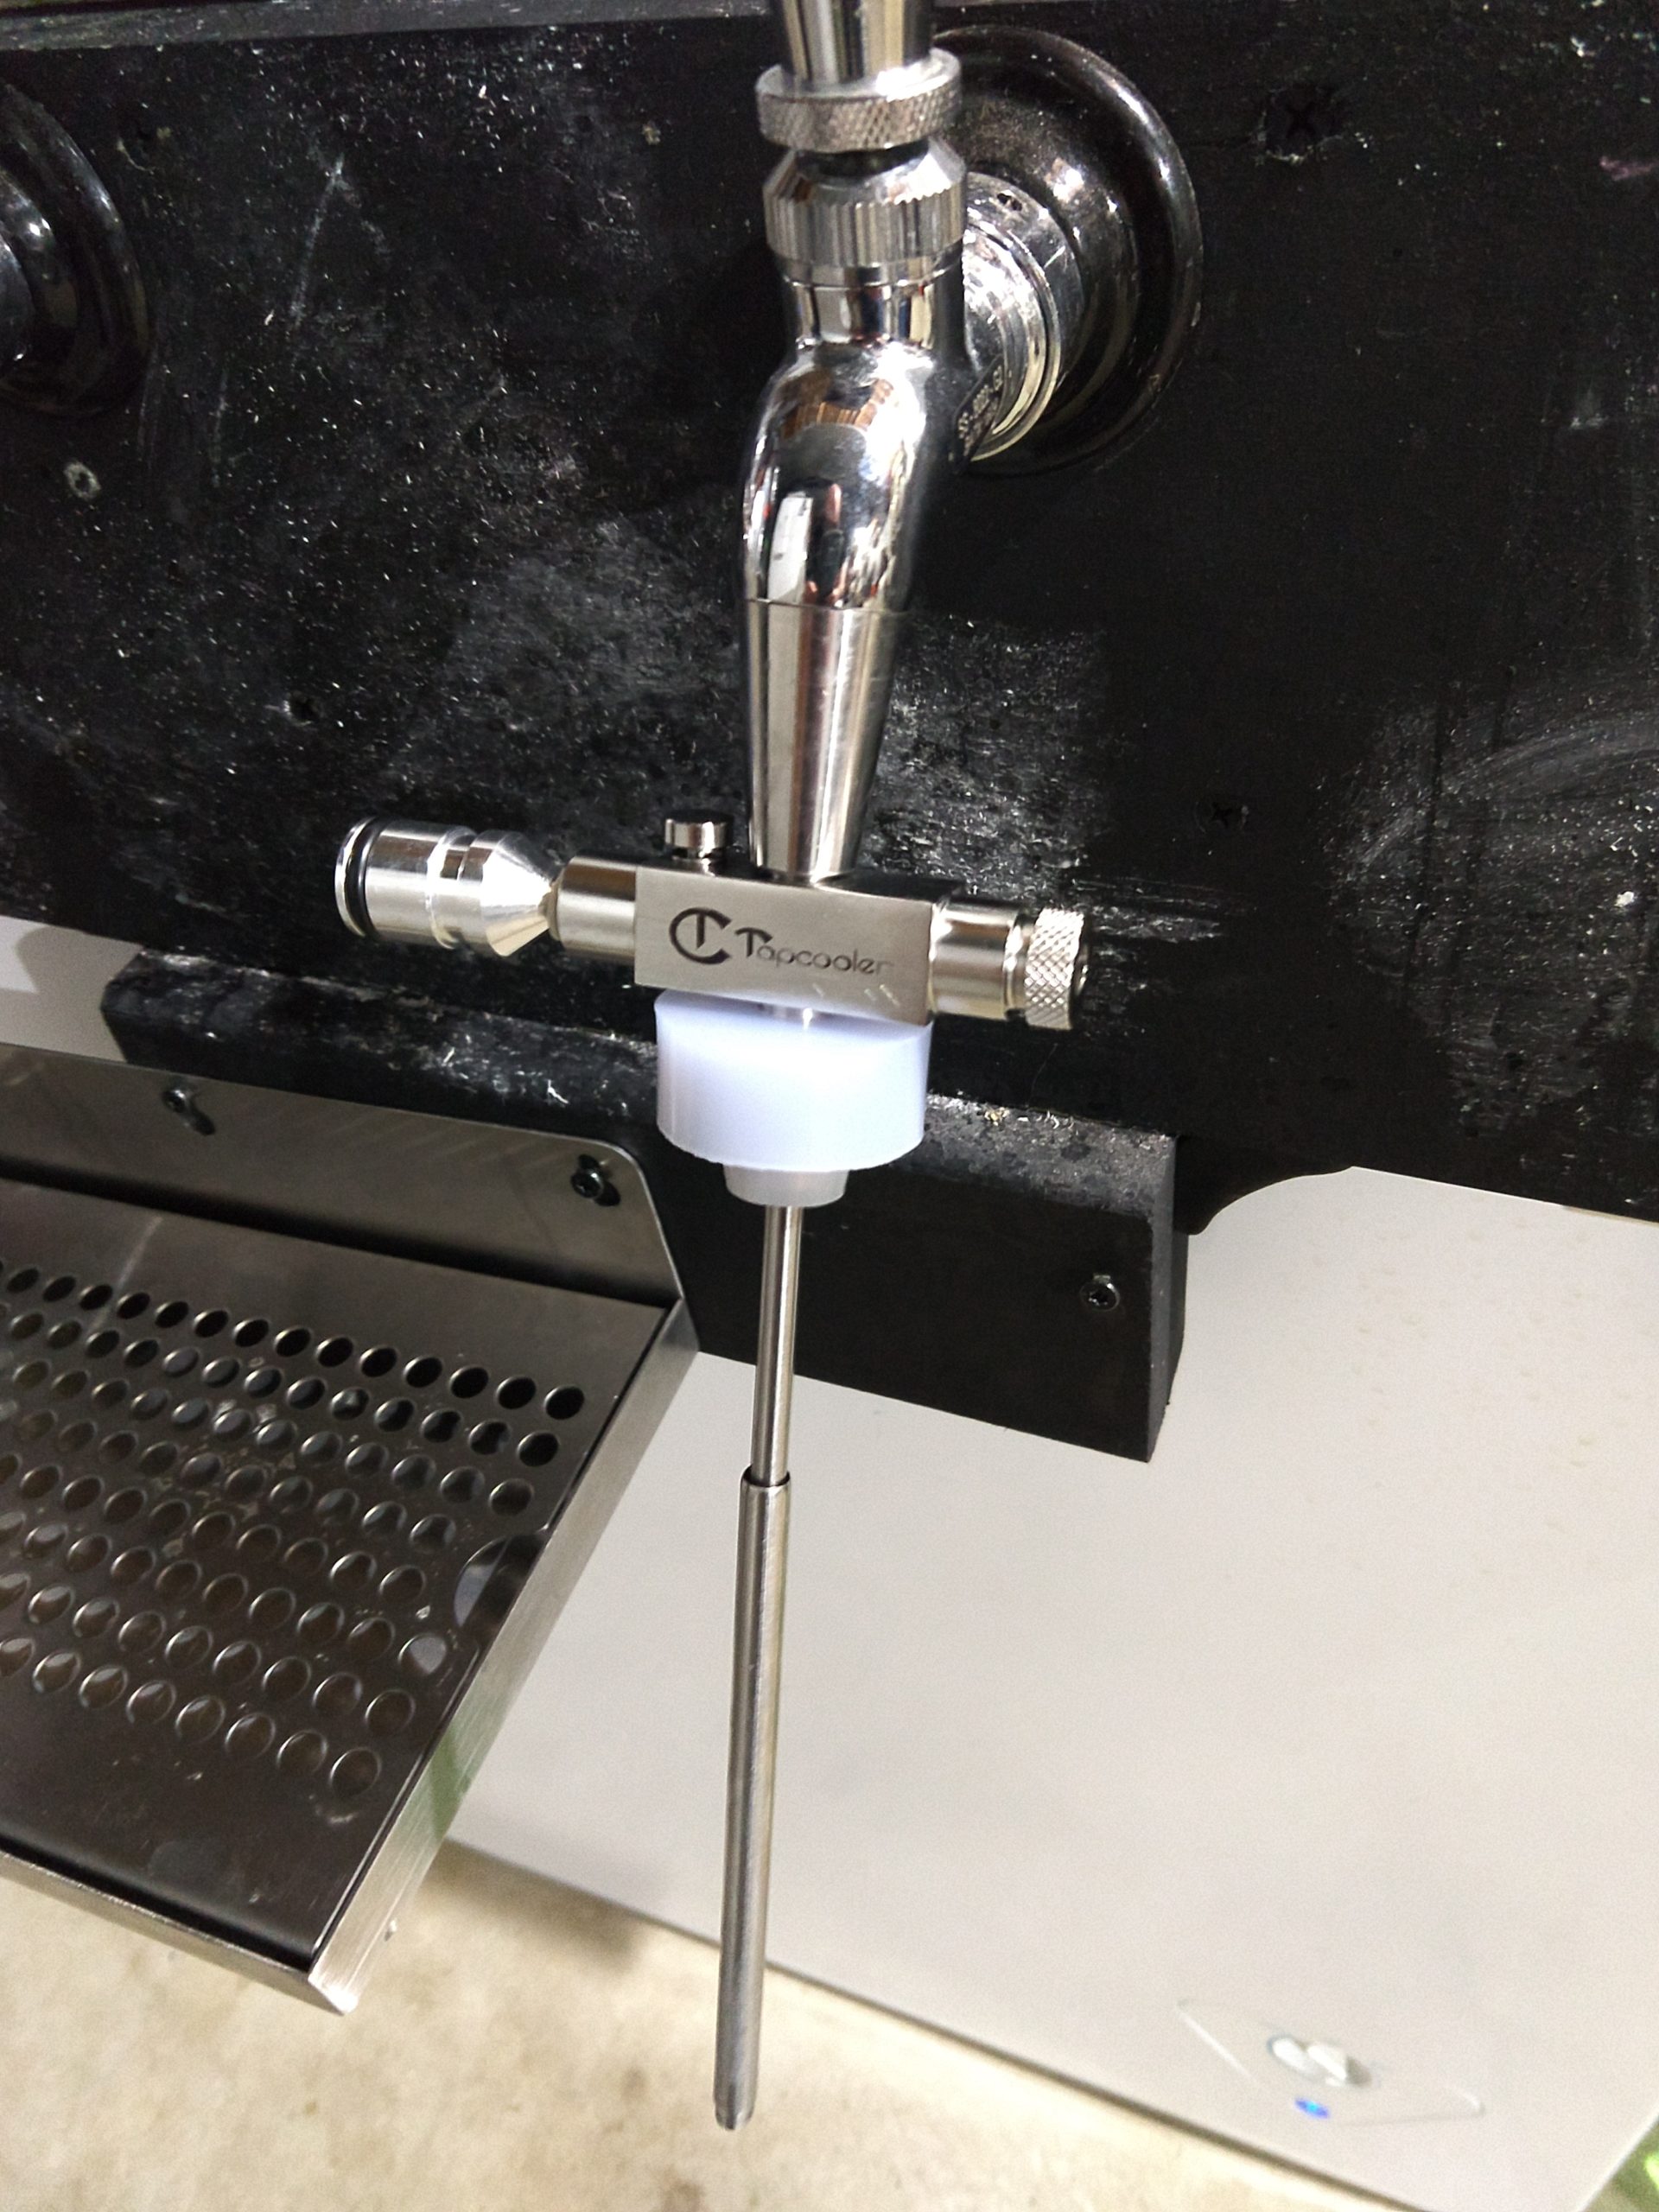
Tapcooler’s bottle filling tools has a number of completely different equipment that go along with the primary unit. The primary physique is a straightforward machined chrome steel manifold with 4 openings. Linked to this manifold are: 1) Inlet for the beer out of your faucet, 2) Outlet for the beer going into the bottle, 3) Stress aid valve for the air/CO2 that will get pushed out of the bottle because it fills with beer, and 4) CO2 Inlet for bottle purging. I’ll break these 4 components down individually.
The inlet is a small chrome steel pipe with two o-rings on the skin to seal inside your faucet spigot. Word that is made to work with ahead sealing faucets (Perlick, Intertap (Fingers on Overview), and so on.), not with the piston/slider faucets. In the event you use a faucet aside from ahead sealing, you’ll get beer leaking and spraying out the entrance of your faucet because it isn’t sealed totally. You push the brief o-ringed pipe into your faucet spigot and it stays seated throughout your filling, making it hands-free. Additionally they have an non-obligatory extension accent that may be a size of versatile tubing and threaded becoming so you possibly can transfer your filling level someplace extra handy if straight subsequent to your faucet doesn’t work. You could have the choice of 11”, 39”, and 78” lengths (which make extra sense in metric items).
The outlet going into the bottle is related to a stainless telescoping tube that’s like a steel straw. This adjustable size permits you to fill bottles as brief as 4.5” or as tall as 12.5”. There’s a silicone topper on this finish so the steel straw goes into your bottle to succeed in to the underside, after which this silicone “cap” pushes excessive of your bottle to seal it off. The silicone is inflexible sufficient to make a superb hermetic match, however versatile sufficient to accommodate slight angles or minor variations on the usual bottle prime.
The stress aid valve has a knurled grip and turns very simply so you can also make very tiny modifications in bottle backpressure simply whereas filling. The fantastic thing about this valve, paired with the silicone sealing cap is that you would be able to hold the carbonation in suspension in your beer. You dispense the beer out of your kegerator/keezer at your regular stress settings, and the backpressure within the bottle retains your beer from foaming up. By adjusting the stress aid valve, you management the fill velocity of the bottle and make sure the minimal quantity of CO2 loss out of suspension. Tapcooler sells an add-on attachment of a protracted vent hose that may plug in to the aid valve. Throughout some fills, you will get a small quantity of froth to return out. The vent hose permits you to direct that right into a bucket or sink so that you don’t need to wipe it up from a desk afterwards.

The final connection port is the CO2 inlet. It has a push to suit hose barb included that you would be able to join a CO2 line to. And what I’d virtually name essential choice is a small machined aluminum ball lock becoming that can be utilized as an alternative of the barb. With that, you possibly can join your commonplace gasoline ball lock disconnect to produce the CO2. CO2 is distributed into the unit by the push of a small set off button on the primary physique. CO2 Is used at first of bottle fill, the place you possibly can purge air out of your bottle with 2-3 seconds of CO2 coming down via the steel outlet straw sitting in your bottle. You come again to the CO2 once more after you’ve completed filling the bottle with beer. You pull the outlet straw out of the liquid and may purge the remaining head house with a fast shot of CO2 earlier than capping the bottle.


Different equipment accessible embrace an alternate inlet reference to a 78” size of tubing with a swivel nut on one aspect and an open/shut ball valve becoming on the opposite. The swivel nut connects to a threaded liquid disconnect, so you possibly can pop it in your keg publish. The ball valve attaches to the primary Tapcooler unit, and you employ the lever to open/shut identical to you’d a faucet deal with in your ahead sealing faucet. You possibly can then use this when you’ve got a keg that isn’t related to a faucet, or should you don’t have ahead sealing faucets.
Tapcooler Fingers on Overview

I had only in the near past used a Blichmann beer gun, filling some cans to seal up in my Cannular (Fingers on Overview). To get that dialed in to get a superb fill quantity, I needed to lower stress on the beer, super-chill it to 32F, and hold the keg in an insulated bag with ice packs whereas filling cans. After which after that, I needed to take care of the mess/clean-up from spinning cans with foam working down the aspect. It made me want there was a neater method. So going into this trial, I had a selected want I needed met.

On my first runs, I needed to do a number of experiments to determine the precise sequence of steps and changes. This after all concerned a pair unintended beer fountains, till I realized the precious lesson of turning off the faucet earlier than eradicating the silicone cap from the bottle. Which in hindsight is a no brainer, however proper out of the field, it appeared a bit daunting with all of the completely different inlets and shops which have a unique perform at completely different instances within the course of. However that was positively just the start, and I bought the cling of it after about half-hour. There’s a pair respectable YouTube movies on the market which are about 5 minutes lengthy that helped me rather a lot.
I used the 11” extension hose as a result of there wasn’t sufficient room for a bottle between my drip tray and the faucet with the Tapcooler unit plugged into it. That labored properly, but it surely was a bit tight and I discovered I actually may’ve used extra flexibility of the 39” extension. One enormous good thing about counterpressure fillers over beer weapons is the truth that you retain the bottle head house pressurized as you’re filling. The result’s, you possibly can fill along with your keg set at your regular carbonation/serving stress, and don’t have all of the CO2 foaming out of suspension as a result of it’s abruptly in an open air setting.

The stress aid valve labored completely. I may simply flip this to regulate the backpressure within the bottle whereas filling. I began out with a sluggish fill, sped up within the center, after which slowed down because the beer began to refill the neck of the bottle. It was wonderful how little foam head there was whereas filling the bottle- in all probability solely about 1/8” thick. I attempted out the overflow tube plugged into the stress aid valve, however discovered I didn’t actually need it. Keeping track of bottle fill progress, and adjusting the discharge stress accordingly, there was hardly any foam popping out the vent.


Listed below are a pair ideas from my expertise. First is to remember to put an o-ring between the stainless pipe that goes in your faucet, and the primary physique of the Tapcooler. In the event you’re utilizing the extension hose, you want one in all these on every finish of the hose the place it screws into the mating components, in any other case you’ll get a relentless drip whereas the beer is flowing. The set-up comes with a number of additional o-rings, however I had misplaced observe when cleansing issues of the place they wanted to be put in. The second tip is after closing the faucet when your bottle is full, do the CO2 top-off within the head house. I didn’t at first as a result of it appeared doubtful that spraying a bit CO2 there would do something aside from waste CO2. However as soon as I attempted it, the profit was apparent because it made the highest of the beer foam up barely and puff out simply above the bottle stage. Excellent for the “cap on foam” recommendation that’s all the time given.


The arrange and clear up was simply my style- not too many steps, and never an excessive amount of time. Recycling bottles is clearly most cost-effective, however requires the ache of cleansing. New bottles might be purchased by the case at about $0.50/every, which is about the identical value you pay for empty cans if you purchase them by the 300-pc case. So I began with new/clear bottles and submerged them in a bucket of cold-water Star San, which was tremendous easy to arrange. And the chilly water doubled as a approach to chill the bottles so I didn’t need to plan forward and stick them within the fridge or something. The easy Tapcooler manifold and hose have been straightforward to wash when finished, and I simply put them within the StarSan bucket for a bit earlier than beginning as properly. The bottle filling course of was amazingly clear, and contained to only the drip tray below my faucets, so no particular pan/bucket/and so on. wanted to catch drips. And naturally capping is a straightforward course of that doesn’t depart beer flung throughout your partitions like I needed to take care of on my canner.

Conclusions
General, the options the Tapcooler bottle filler gives appear unparalleled. This seems like “Homebrew Bottling 2.0” for people who have graduated from bottles to kegs. It’s the following section within the evolution that you would be able to make the most of all that kegging brings you, however have an excellent straightforward approach to bottle a number of to share. The method was really easy, that I turned to it throughout these instances of Social Distancing the place I couldn’t have neighbors over to strive my newest brew. As soon as my keg was prepared, I spent an hour bottling up a case of beer, then delivered 6-packs to their entrance porches. This has completely obsoleted my canner, because it gives such a greater product with the counterpressure, takes so little prep time, and is really easy to wash up after.
Examine Present Pricing and View Out there Equipment
Additionally: Nano Canner Canning System:

TAPCOOLER NANOCANNER™ COUNTER PRESSURE CAN FILLER COMPLETE KIT
Homebrew Canning System Opinions!
Additionally Contemplate – Nukatap Counter Stress Filler:
Associated Opinions
Extra Pictures


Extra Homebrew Finds!
Latest Offers!

10 Most Latest Homebrew Useful resource Posts & How-To’s!

We’re Homebrew Overview HQ! Our 10 Most Latest Opinions

Rebuild Your Kegs!
Every part for Your Kegerator!
Additionally: Kegerator Ideas & Gear | Keg Restore Half #s | Latest Keg Finds
Our Prime Draft Sources!
Particular Due to Nice Fermentations for offering the unit used for analysis on this assessment.
By Brad Probert. Try Brad’s web site – beersnobby.com
assessment:tapcooler tag:tpr rs:6
