This assessment is by Homebrew Finds Contributor Brad Probert. Brad is an engineer, knowledgeable homebrewer and skilled reviewer. Seize a hyperlink to Brad’s web site on the finish of this assessment.
Torcido Lager is a Mexican Lager. Kind of. I don’t know a lot concerning the type definition of a Mexican Lager, however MoreBeer’s website describes the recipe creation from Barebottle Brewing (San Francisco, CA) as non-traditional. Apparently, Barebottle likes mixing issues up, in order that they describe this beer as a Mexican Pilsner with a German Helles twist. For Barebottle, this beer scored a Gold within the 2019 GABF, so loopy description apart, I figured the beer had some cred behind it.
Get Pricing & Verify Availability, Overview Continues Under:
Unboxing and Package Stock

I ordered un-milled grains, as I wish to have management of the grain crush. The malts have been packaged in pre-measured baggage, with Viking Pilsner Malt, Weyerman CaraHell, and a few flaked maize. The hops got here in light-proof, thick baggage, the place the hops have been nitrogen flushed earlier than bagging. Along with the pellet hops, there was a Kick Carrageenan tablet- a clarifier used within the boil kettle. The recipe kits from MoreBeer don’t include a particular yeast, as an alternative they provide you a listing of yeast suggestions from a few of the completely different yeast distributors they carry (White Labs, Wyeast, Omega, and Fermentis Dry). Following the style-bucking development of the recipe creator, MoreBeer prompt I attempt a Cellar Science dry yeast known as Berlin. Along with the elements, there was a recipe card with fundamental brewing instructions, a cut-out form to go together with the MoreBeer customized faucet deal with, and a sheet of fundamental brewing course of ideas.

As I had plans to do a fermentation side-by-side experiment, I really brewed this with two recipe kits mixed into one batch to make a single ~11-gallon batch to separate between two fermentors. This was simply managed in my 15-gallon kettles
Brew Day

The recipe instructions have been very common. For instance, they gave mash temperature, however didn’t specify a mash time. For seasoned brewers, it is a welcome flexibility, since all of us have our explicit opinions on sure course of particulars. For newbies, this would possibly imply slightly exterior analysis is required, which may very well be an excellent studying expertise anyway. The recipe known as for a 148F mash. My earlier expertise led me to mash for 75 minutes at that decrease mash temperature, and I all the time end each mash with a 10-minute relaxation at 168F. I adjusted water with brewing salts to match Brewfather’s “Pilsen (Mild Lager)” water profile and lactic acid to regulate the pH. I ended up with a measured pH of 5.57 within the mash, increased than the 5.3 I used to be focusing on. I then did a 60-minute boil, the place I added the hops as per the schedule. I added the Kick Carrageenan pill with 5 minutes left within the boil. Similar as final time I used this clarifying pill, lengthy strings of issues fashioned within the kettle that I don’t usually see with my Irish Moss. I hit an Authentic Gravity of 1.044, with a barely increased mash effectivity than I anticipated.
Fermentation

After the wort was chilled post-boil, I stuffed two FermZilla All Rounder fermentors – Fingers on Overview, alternating the stream backwards and forwards between the 2 fermentors till they have been each at equal quantity of about 5.4 gallons in every. I’ve solely fermented with dry yeast one different time over a number of years of brewing. I’ve learn concerning the excellent strategy of rehydrating the yeast earlier than pitching. However digging into the main points of this, that was much more headache than I wished to entertain, so I simply pitched the yeast into every fermentor straight from the pack. I used 2 packs in every fermentor, to make sure I had an excellent pitch. Since one pack is meant to inoculate a full 5-6 gallon batch, I undoubtedly had ample yeast cell rely.

The primary batch I fermented at typical cool lager temperatures utilizing a Cool Zone Brewing stretchy Velcro cooling manifold on the skin of the fermentor. I began this one off at 55F and held there for five days, permitting CO2 to flee by way of a blowoff tube. I then regularly bumped up the temperature by about 2 levels each time I noticed the SG fee begin to gradual, as I monitored gravity frequently with a Tilt. The gravity drop actually slowed after about 12 days however stored slowly dropping so I let it end out at 64F. It stayed within the fermentor till 20 days, reaching a FG of 1.012 (4.2% ABV), or 72% obvious attenuation. I moved the entire fermentor into my beer fridge to chilly crash. After 3 days within the 35F fridge, I pushed it right into a purged keg utilizing bottled CO2 for a closed switch, then hooked it as much as CO2 for ‘set it & overlook it’ carbonation.

The second fermentor I left sitting in my basement with none temperature management. Out of my counterflow chiller, the wort began at 62F within the fermentor. I left the spunding valve open for the primary 24 hours to provide the yeast an opportunity to get began, then I closed down the spunding valve to construct stress. Keeping track of the stress, it climbed about 1.5 psi each hour. As soon as it reached 14 psi after 10 hours, I adjusted the spunding valve to manage there. With cool basement temperatures, it stayed at 62F and 14 psi for 3 extra days. As gravity drop began to gradual, I raised the temperature over the subsequent 3 days till I reached 72F. At that time, I left issues at 72F and 14psi as gravity continued to drop very slowly. Lastly, 23 days after my preliminary yeast pitch, gravity had been steady lengthy sufficient and I moved the entire fermentor into my beer fridge to chilly crash. It reached a decrease FG than my cold-fermented pattern, measuring a FG of 1.009 (4.6% ABV), or 79% obvious attenuation. After 3 days within the 35F fridge, I pushed it right into a purged keg utilizing bottled CO2 for a closed switch, then hooked it as much as CO2 for ‘set it & overlook it’ carbonation.
Preliminary Impressions
I’ll first share my impressions concerning the beer general, then I’ll get into the comparability of the cut up batch. The beer got here out rather well. I wasn’t positive what a German Helles/Mexican Lager would style like, and I’ll admit I used to be skeptical about each the flaked maize and dry yeast. However I discovered the distinct contribution from the flaked maize of a lightweight candy aroma in addition to delicate sweetness within the preliminary style made it tremendous inviting. And the yeast stayed out of the best way from a taste contribution, aside from it perhaps tweaked the sweetness a bit, which labored effectively with the small chew from the Crystal and Saaz hops. It was flavorful and simple consuming. With the ABV 4.2 – 4.6%, it made an excellent session beer.
Stress vs Chilly
The purpose of this facet by facet take a look at was to see how a beer fermented within the really helpful chilly vary and never below stress, in comparison with a beer fermented hotter that was below stress. The idea/query being, can your lager prove simply nearly as good, even in the event you’re fermenting at room temperature and never messing round with making an attempt to maintain it cool throughout fermentation?
I’d accomplished a little bit of on-line analysis, plus a couple of cut up batch experiments with fermenting below stress beforehand, so I knew sufficient to have a plan for deal with this batch. I adopted my course of purpose of not doing any wort cooling, however the stress ferment batch began out fairly cool. I might guess that had I been fermenting below stress at 72F as an alternative of 62F, I might have gotten completely different outcomes. However this did meet a advice from a yeast producer that for finest outcomes on pressurized fermentation it’s best to attempt to begin fermentation no less than on the prime finish of the really helpful temperature vary (Berlin yeast really helpful vary of 54-62F). These disclaimers out of the best way, I might detect a notable distinction when the beer was very younger, after ~1 week within the keg. At that time, the chilly fermented beer had an excellent aroma and candy style of the maize, whereas the stress fermented beer had an astringent aftertaste.

After I tasted once more at 4 weeks lagering, I might nonetheless detect these taste developments, however each have been much less pronounced. In my blind tastings for myself, I used to be capable of distinguish the beers, sometimes as a result of slight astringency within the stress fermented beer. I poured 2 samples of every into opaque cups, then randomly shuffled the cups and chosen 3 of the 4 cups for tasting. I then decided which 2 cups have been the identical beer, and which was the odd beer out. I additionally did the identical blind tasting course of with some neighbors. Altogether, out of the 9 tasters, 6 have been capable of separate the beers, as summarized beneath.


Blind Tasting

9 Blind Tastings
- 3 Couldn’t establish
- 6 Might establish
- 4 Most well-liked cold-fermented
- 1 Most well-liked pressure-fermented
- 1 No desire
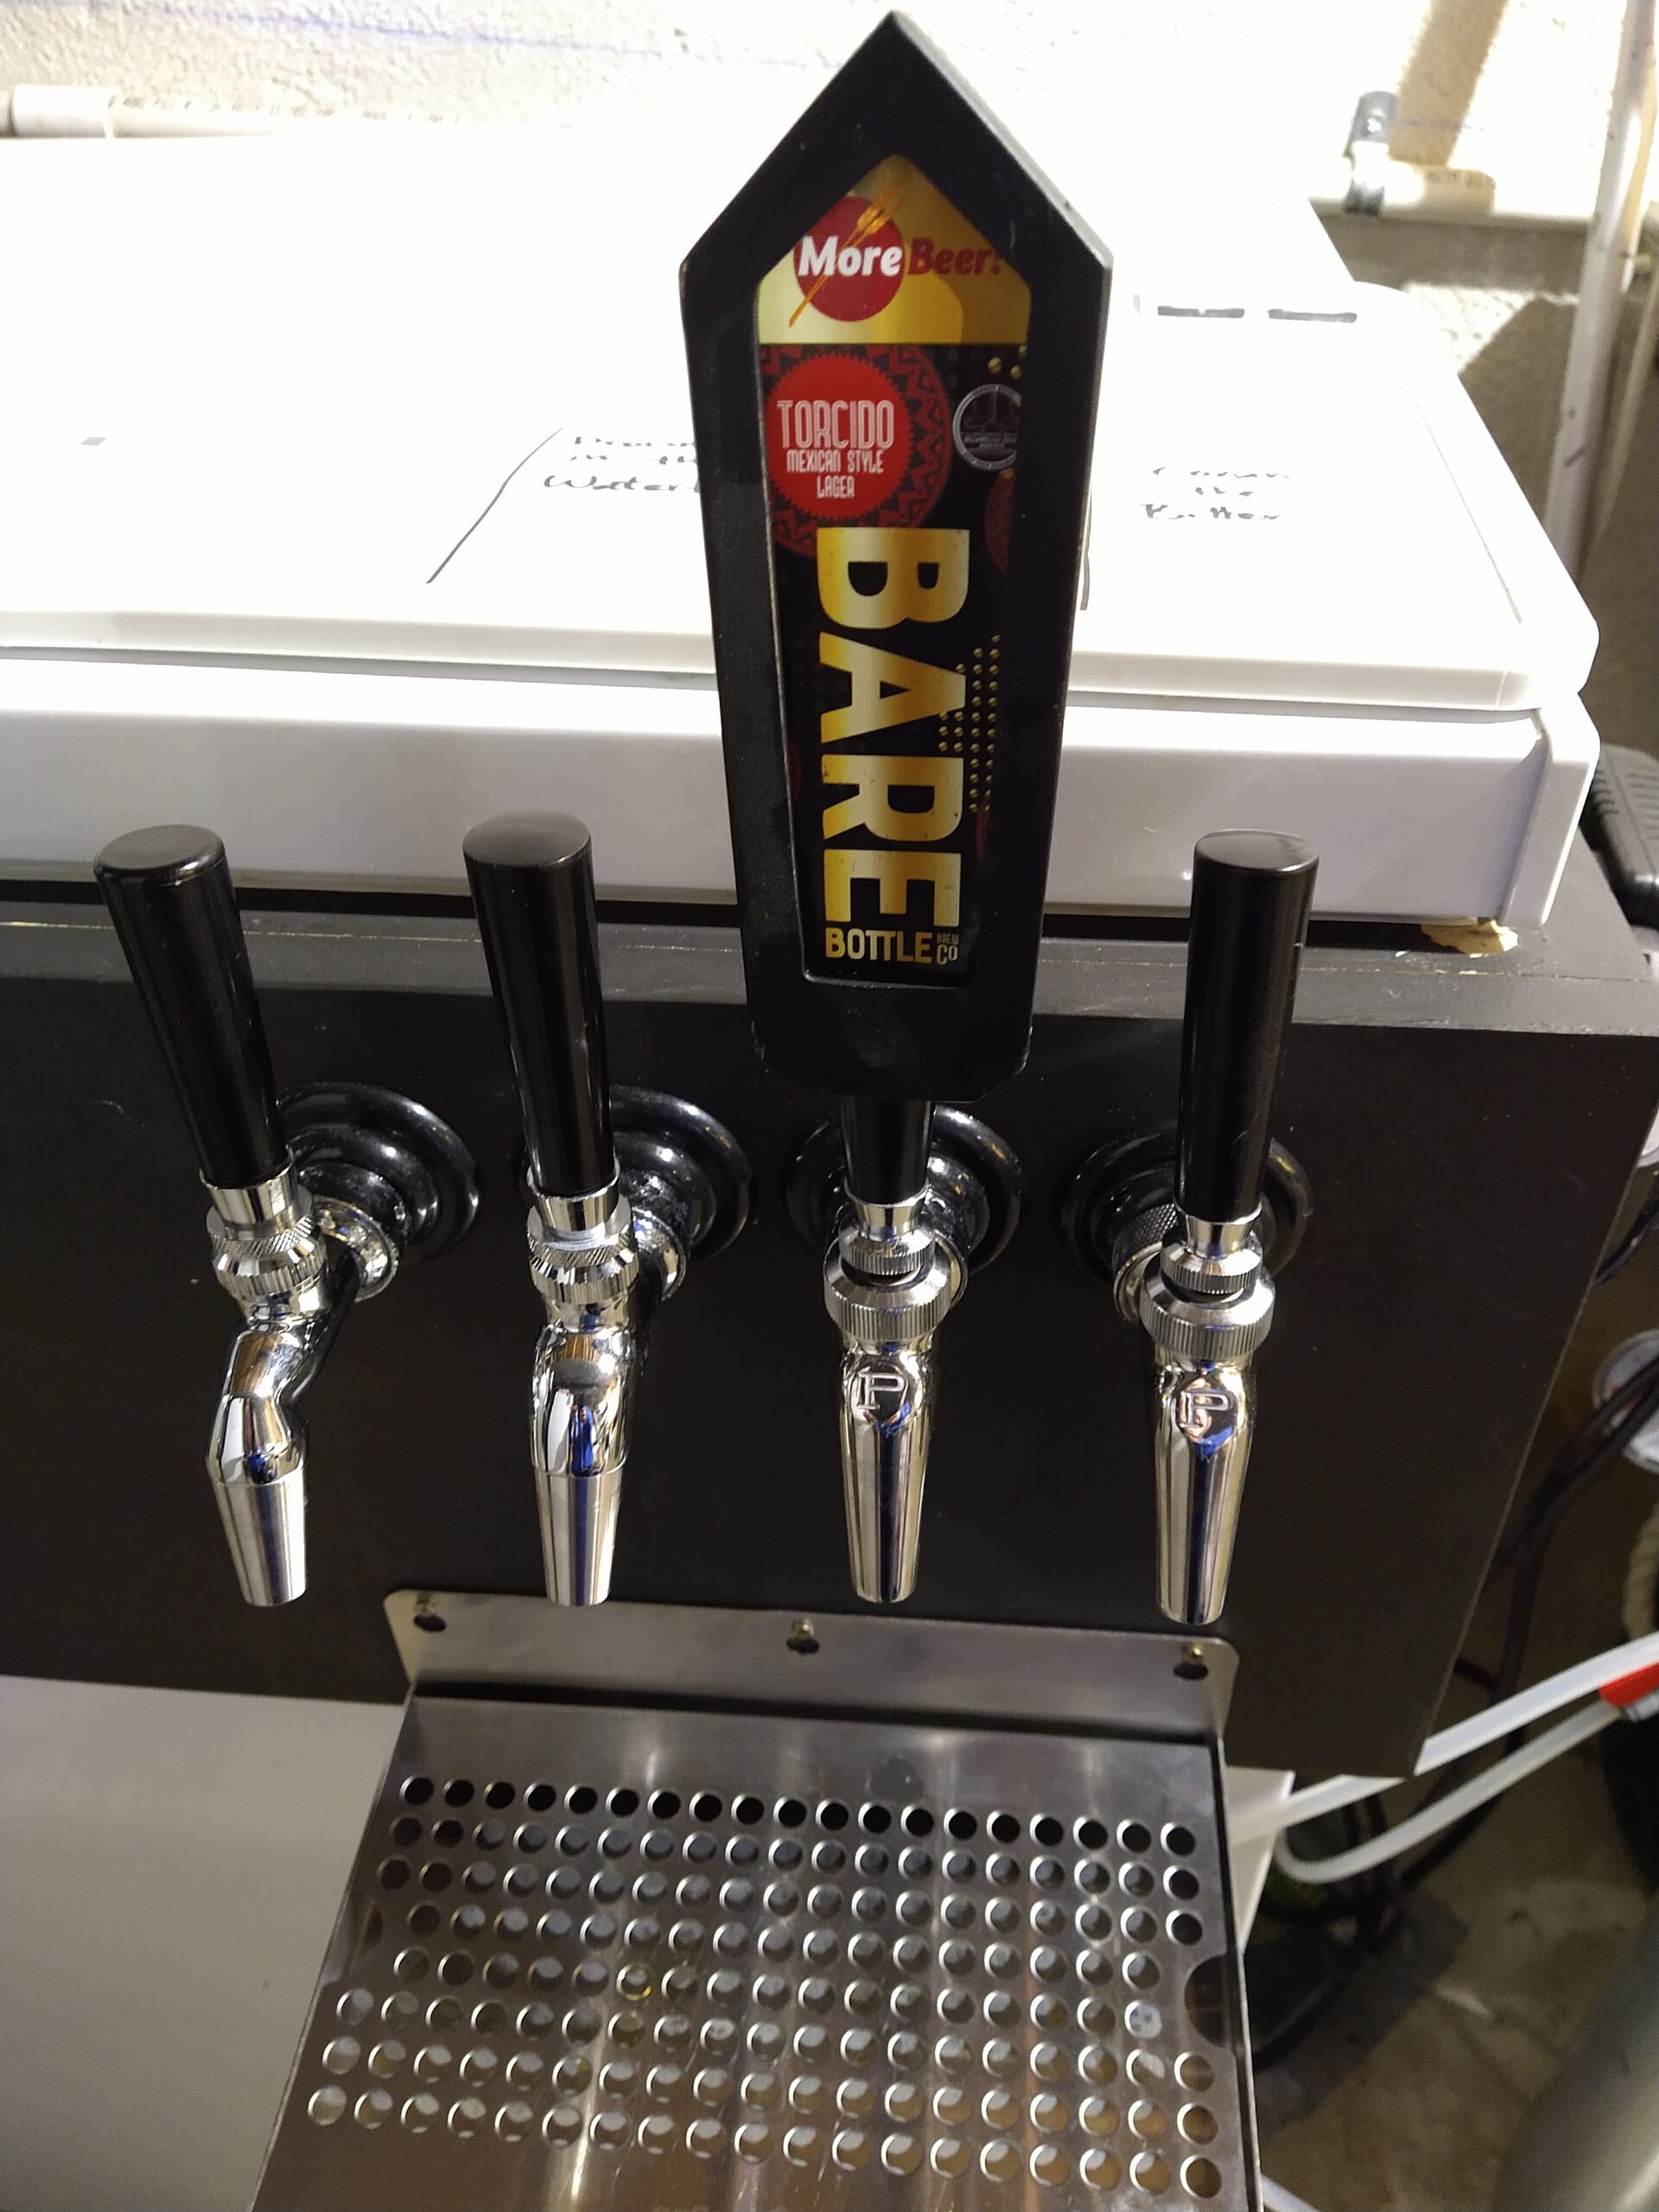
Customized Faucet Deal with and Included Insert
Customized Faucet Deal with for Recipe Card Insert or Chalk Writing on Clean Inserts. Be aware: All MoreBeer recipe kits embody a free insert that works with this faucet deal with.
Faucet Deal with with Included Professionally designed insert
Conclusions
The recipe equipment was made up of excellent high quality elements, because the clear style of the completed lager attested to. I realized that maize may very well be an ingredient used with intention for taste and is not only an inexpensive malt substitute. I additionally discovered the Cellar Science Berlin dry yeast to be a clear lager yeast with good taste contributions with out the bags of diacetyl or sulphur. And my pressurized fermentation experiment confirmed me you can get fairly shut in taste with out utilizing fermentation cooling tools, however chilly fermentation nonetheless offered a greater character general.
Associated, Overview (LOTS Extra Information) Continues Under:
Fermentation Knowledge Plots
Fermentation Plots utilizing TILT Bluetooth Hydrometer – Fingers on Overview


Extra Photographs


Get a Deal on Bulk Grain:

Hop Offers!


Our Spunding Valve Useful resource Publish!
Extra MoreBeer Critiques+Associated:

Extra Homebrew Finds!
Latest Offers!

10 Most Latest Homebrew Useful resource Posts & How-To’s!

Particular Due to MoreBeer for offering the equipment used for analysis on this assessment.
By Brad Probert. Take a look at Brad’s web site – beersnobby.com
assessment:b3torcido tag:tpr
